How to create CNAME record to install your HTML5 webapp on your own domain
Written by Dumè Siacci on
That was one of the great features that came with GoodBarber Salvador back in September. Every GoodBarber account has a great web app associated, in addition to the native app for iPhone and the native app for Android.
Your natives apps are distributed in the App Store and in Google Play. But what about the web app?
By default, your web app is located on http://<appname>.goodbarber.com/m/. But you can (you should?) change this URL and choose your own.
For instance, you can decide to link your web app to http://m.yourdomain.com
That will be far more convenient for your users to access your html5 web app, right ?
That's what we're going to do together in this post.
Let's start from the beginning

This illustration comes from Wikipedia
In order to make your HTML5 web app use your own domain name (or subdomain), you will have to make some modifications in your registrar's interface. You'll define a CNAME record associated with GoodBarber for your domain name.
You probably know that computers on the internet (typically web servers) are identified by their IP addresses. The domain names (the names you type to access a website, like yourdomain.com), are managed by a system called DNS, which stands for Domain Name System .
Wikipedia says about the DNS:
"An often-used analogy to explain the Domain Name System is that it serves as the phone book for the Internet by translating human-friendly computer hostnames into IP addresses. For example, the domain name www.example.com translates to the address 93.184.216.119. [...]
A DNS name server is a server that stores the DNS records for a domain name [...] and responds with answers to queries against its database."
Unless you've changed it, the DNS server associated with your domain name is the one of your registrar. That's where you'll be able to manage the DNS records for your domain name.
Typically, you will find several types of records in your DNS server : the MX are the ones used by e-mail clients, the A ones are the main ones, and the CNAME are the ones we're focusing on :)
Creating a CNAME record
In this example, we'll have a look at the GoDaddy manager.
Each registrar has its own interface to manage the DNS records, so it's not possible to give a universal step-by-step process to follow. Anyway, most of the time the steps will be the same. You registrar has also probably some guides that you can follow to create the CNAME record.
Go to your GoodBarber backend, in the Publication > Submit > HTML5 menu
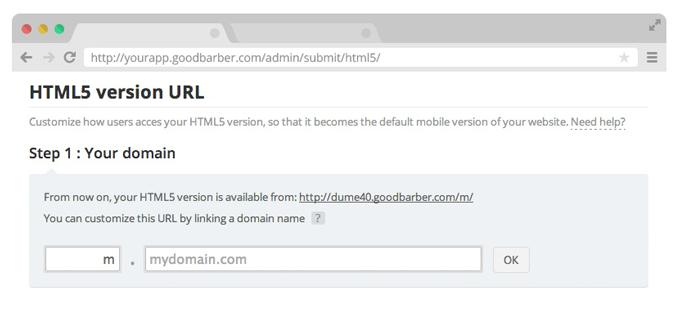
The first step is easy: you just have to enter your domain name, and choose which subdomain you want for your HTML5 web app.
Click on the OK button.
Go to your GoDaddy domain manager
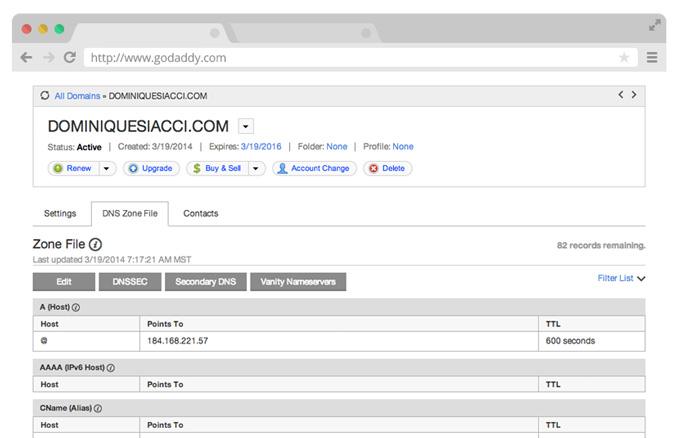
Select your domain name in the list, and click on the DNS Zone File tab.
Here you are! The lines you see are the DNS records associated with your domain name.
Click now on the Edit button.
Click on Add Record button
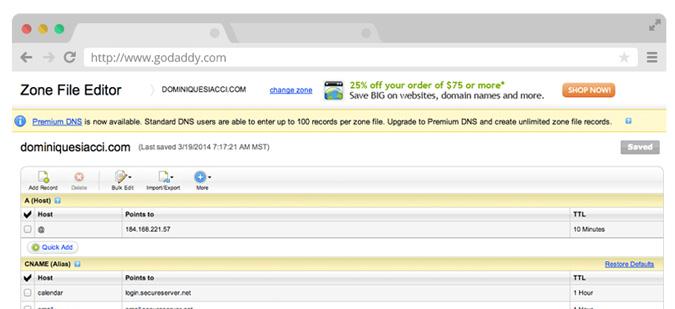
In the header of the Zone File Editor, you should see a button called Add record. Click on it, that's exactly what we're here to do.
Set up your record
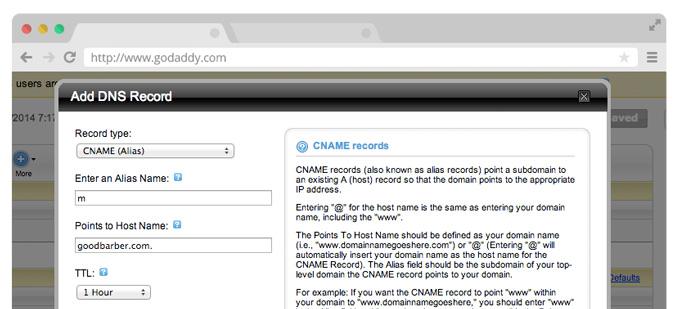
Fill the form with the info that you can find in your GoodBarber backend.
- Record type: CNAME
- Alias name: the value which is displayed in the Name column
- Points to host name: the value which is displayed in the Server column
- TTL: leave the default value
- TTL: leave the default value
Click on OK to validate.
Don't forget to save your modifications
Click on the Save zone file button.
Go back to your GoodBarber backend
You can now go back to your GoodBarber backend and finish the process: just click on the button called Finalize the installation.
You have now finished the process, but it can take several hours (the time of the DNS propagation) to be fully working. Once done, you'll be able to access your HTML5 web app directly from your domain name.
And after ... ?
Another interesting point can be to automatically redirect the visitors of your website to your HTML5 web app if they're visiting your website from a mobile phone. You can find the small piece of code to copy & paste on your website header in the Publication > HTML5 menu.